


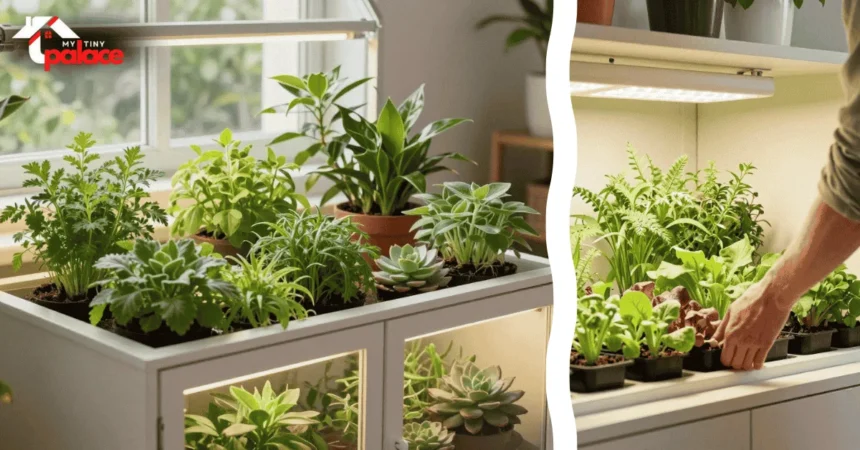
Have you seen all the lush, green plants on social media lately? People are turning IKEA cabinets into mini greenhouses. This trend, known as an ikeagreenhousecabinet, makes any room look amazing.
This trend is not just a quick fashion. It’s perfect for plants that need a lot of moisture. An IKEA greenhouse cabinet helps keep the right humidity and shows off your plants beautifully, especially with the doors of the cabinet open.
Whether you’re new to plants or have a big collection, this hobby is fun and rewarding. You’ll learn to make a display that looks great and works well. Let’s get started on your project today.
Choosing the Right IKEA Cabinet for Your Greenhouse
Starting your indoor garden journey means picking the right base. The right cabinet is key, as each model has its own seal and space. This choice is crucial for your DIY project.

Think about your space’s size and the height of your plants. IKEA cabinets come in different sizes and glass types. They fit various plant collections, enhancing the aesthetic of your entire cabinet.

The Milsbo cabinet is great for those with tall plants. It has a wide area for a modern look. This makes your plants stand out.
The Rudsta is perfect for small spaces, making it an ideal choice for your Ikea Milsbo. It’s compact but still has all the features of a good cabinet.
The Detolf is ideal for tall, narrow displays. But the Milsbo or other big units might be better for heavy shelves.
Your choice of cabinet depends on your style and plant needs. Make sure to measure your space. This ensures your new cabinet fits well.
Preparing Your Cabinet for Greenhouse Conversion
Before adding your first plant, you need to get your cabinet ready for a greenhouse by considering some cabinet DIYs. This setup is crucial for keeping your plants happy and healthy. It also makes sure your cabinet stays safe and moisture-rich.
To start, you’ll need to run power cables through the cabinet. Use a hole saw to make a hole in the bottom or back. This lets you neatly pass cables without harming the cabinet.
After drilling, focus on keeping humidity in. Use foam tape around the cabinet doors for a tight seal. This keeps moisture in and prevents water damage on your floors.
It’s also key to manage your electrical parts well. Put a cable management box at the cabinet’s bottom for your power strips and wiring. This keeps everything tidy and safe from water, making your garden look great and stay safe in the entire cabinet.
Installing Lighting for Optimal Plant Growth
Turning your IKEA cabinet into a garden needs the right lighting. Since sunlight is blocked by the frame and glass, you must provide enough light. A good grow light acts as the sun, giving plants the energy they need.
Choose between a strong top light or flexible LED strips to brighten your space and enhance the aesthetic of your cabinet. Many like LED strips because they light up the whole cabinet evenly. These lights are easy to plug into a power strip with a USB connection.
Mount your lights with zip ties to keep them tight on the metal frame. This keeps wires tidy and prevents lights from falling on your plants. By placing the strips correctly, every shelf gets the same light.
Keeping a consistent light schedule is key for plant growth and can be easily managed in your entire cabinet. Use a timer to automate the light period. This way, plants get the same amount of light every day, without you needing to remember. Whether it’s one bulb or many LEDs, this setup helps plants grow well inside the cabinet.
Managing Humidity and Air Circulation
Creating a stable environment inside your cabinet is key. Tropical plants need high humidity, like their forest homes, which can be achieved with the right cabinet modifications. But still, air can cause fungal growth and root rot.
To keep the right humidity, use a humidifier in the cabinet when it’s dry. A small, ultrasonic humidifier keeps moisture steady without wetting leaves. Always check the humidity with a digital hygrometer to avoid too much moisture.
Good air circulation is as crucial as moisture control. An AC Infinity fan system moves air well, helping plants grow strong and preventing mold. These fans are quiet and work well in terrariums.
Even with fans, sometimes you need to open the cabinet to let in fresh air. If you see a lot of condensation, opening it for a bit lowers the humidity. This keeps the air fresh and prevents it from getting stale.
By using a humidifier and good ventilation, you make a great microclimate. Regular checks keep your plants healthy and lively all year. With these tools, managing your indoor garden is easy.
Customizing Shelving and Interior Layout
Customizing your cabinet interior is the best way to showcase your unique plant collection and make a stunning aesthetic. By adjusting your layout, you can accommodate every plant, from trailing vines to large-leafed specimens. This process ensures that your setup is both functional and visually stunning.
When selecting your base, consider the benefits of different materials. Standard glass shelves provide a clean look and help maintain humidity, but they can block airflow. In contrast, wire shelves allow for better air circulation and light penetration, which is vital for healthy growth.
You can easily hang your favorite Hoya or trailing philodendron by using magnetic hooks on the metal frame. If you need more stability, a custom bracket can be attached to the walls to support heavier pots. For those who prefer a modular approach, metal plates can be secured with double-sided tape to create new mounting points.
Arranging your aroids requires a strategic eye to maximize space. Place your large anthurium or alocasia on the bottom levels where they have room to spread their foliage. You can highlight a rare variegated specimen by placing it in the center of the cabinet where it receives the most consistent light.
Every shelf should be positioned to allow for vertical growth. By mixing hanging plants with those on surfaces, you create a lush, layered effect. This thoughtful arrangement ensures that your indoor garden remains a thriving sanctuary for all your botanical treasures.
Essential Maintenance for a Thriving Indoor Garden
Regular care is key to a healthy houseplant collection. A consistent routine keeps your indoor garden beautiful for years. Small steps can stop big problems before they start, such as ensuring the doors of the cabinet are properly sealed.
Use a digital meter to watch your environment. It tracks temperature and humidity levels all day. This lets you fix issues before they harm your plants.
Moisture in a glass cabinet can cause rust on metal parts, so consider drilling a hole for better ventilation. Clean metal frames and hinges with a dry cloth often. A thin layer of wax or sealant can also protect against rust.
Managing water runoff is crucial. Make sure water doesn’t collect at the bottom of the cabinet. Drainage trays or mats can help keep the area dry and prevent damage.
Stay on top of these tasks to keep your cabinet clean. Your plants will grow strong and green. With regular care, your indoor oasis will thrive for years.
Conclusion
Turning an IKEA cabinet into an indoor greenhouse is a great idea. It creates a lively space for your tropical plants. At the same time, it lets you show off your personal style.
This project gives you a piece of furniture that’s both useful and beautiful. It becomes a centerpiece in your home. Many people pick this option because it makes their space look better.
Your new greenhouse is like a living art piece. It brings nature into your life, transforming your space into an aesthetic haven. And it keeps your plants healthy and green.
Think about how this changes your home’s look. A well-lit cabinet makes a calm space. It’s perfect for unwinding after a busy day.
Don’t be shy to share your progress with other plant lovers on Instagram, showcasing your cabinet DIYs. Post pictures of your setup. Show everyone how you made your space unique on Instagram by sharing your cabinet DIYs.
Your indoor gardening adventure begins with this cabinet. Enjoy watching your plants grow and flourish in their new home.